Puyallup Bathroom Remodel
We had a great time updating this early 90’s home. The original builder really emphasized quality, which meant we didn’t encounter and unexpected issues. This just goes to show how crucial a good start can be.


Projects like this always begin with selections and design decisions. The homeowner crafted the design and made the necessary selections. Once the materials were ordered, we confirmed the schedule and began the project. We started by protecting the floors and setting up dust walls, then dove into demolition. Our goal was to remove the soaker tub, slightly widen the shower, and install a freestanding tub. Of course, getting rid of the carpet in the bathroom was also a top priority!
Once the bathroom was down to the drywall, we made necessary plumbing and electrical modifications. We repaired the subfloor, fixed the floor squeaks, and began putting everything back together. While the shower unit was going to be tiled, we decided to start with drywall and paint instead of the tile backer board to avoid potential damage to the waterproof backer board and shower pan.
For this shower, we utilized the Schluter Kerdi system, which is preformed and ready for, saving time on the tile preparation. We used a standard cement backer board on the rest of the bathroom floor. We began the tile installation by confirming the layout and ensuring everything lined up and looked good.
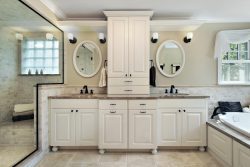
Once the tile was grouted, we moved on to installing the finishing fixtures. This is when things really started to come together. With the countertop and freestanding tub in place, the transformation was evident. The bathroom felt much more spacious and modern. We complete touch ups, checked off our punch list, and our protective materials. Now it was for the final walk-through!


The bathroom design stunning, blending modern touches with improved functionality for the homeowner. This project was incredibly enjoyable, and the house was a pleasure to work on. We’re excited for future projects in this home!